Blog

Project Profile: Summer Savoyards Set-Building for “Arsenic and Old Lace”

James “Evil Jim” Ulrich and Mary Donnelly are two long-standing members of the Binghamton musical drama troupe Summer Savoyards, which has been putting on plays in various local venues since 1961. The Savoyards’ latest production of the beloved dark comedy “Arsenic and Old Lace” will be hosted in the Bundy mansion in downtown Binghamton on the first two weekends of April, and Jim and Mary have been building set pieces for it in the wood shop at the Makerspace!

Summer Savoyards chose to put on “Arsenic” because its darkly hilarious story appealed to the Savoyards’ executive board as well as several regular participants in the Savoyards’ productions. Savoyards’ main focus has traditionally been recurring adaptations of various Gilbert and Sullivan plays, but everyone involved felt like trying to adapt something different,  and to make use of a new venue in the Bundy mansion annex (in cooperation with some acquaintances there who wanted to promote Bundy as an events venue). Mary volunteered to be the play director, Jim volunteered to take charge of set design and construction, and everyone set about preparing for the show.

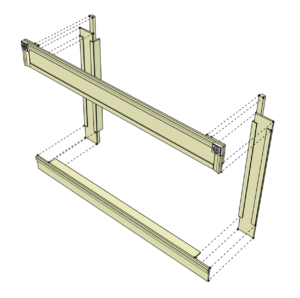
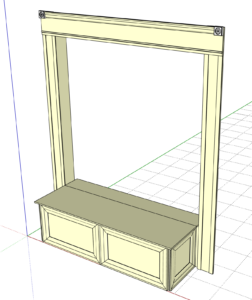
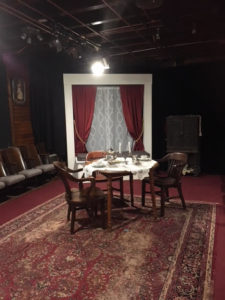
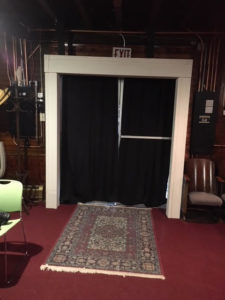
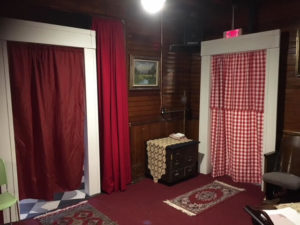
Mary wanted to have the show provide a more immersive than usual experience with respect to the audience, both for the sake of providing a fresh take on the play and because of the spacial limitations of the venue at Bundy. As such, Jim set about creating a seating layout for the venue which allowed for a reasonably sized audience to sit within a space arranged with some minimalistic set pieces designed to invoke the feel of a late Victorian living room (i.e., the set of the play), along with several pieces of Victorian furniture (a love seat, a china cabinet, etc.) sourced from Savoyards participants. Jim created or modified designs for several mock door and window frames in the modelling program SketchUp with elaborate detailing reminiscent of the Victorian era, as shown in the screenshots below, based on various Victorianesque design ideas he found through online research. Once he’d created and refined these designs, based on feedback from the other members of Savoyards with respect to physical size and layout, he printed them out with their corresponding bills of materials and cut lists, and took them to the TCMS wood shop to build them.

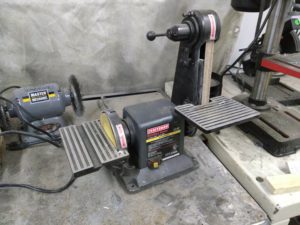
The Makerspace has been used by Jim for building set pieces for past Savoyards productions, but this production involved the largest utilisation of the wood shop for building set pieces yet. Jim, with the help of Mary, Amanda Truin, Eric Adler, and a few odd volunteers, had to build a full padded window seat with a window frame, five additional window frames to be suspended from the ceiling (including one created specifically cover a whiteboard in the annex), and several mock doorway frames. They had $500 to purchase materials to build these set pieces (plus a few additional material donations from Jim), and five weeks to build everything using the tools at TCMS plus a few additional ones provided by Jim. These tools included a table saw and sawhorses, a router, a screw gun, a pneumatic stapler, a multitool, a body grinder, a jigsaw, a chop saw, and various paintbrushes.

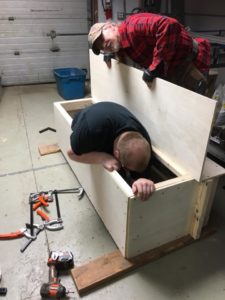
Most of the set pieces were built according to the original SketchUp designs, but there were a few modifications made along the way for various reasons. For example, the window seat’s lid was given an additional layer of  1/2” plywood to strengthen it, as various people would be sitting on it throughout the play and the original lid was deemed insufficiently rigid. This lid’s hinges were also extensively modified in several ways to make them squeaky for effect, including treating them with acid and a degreaser, having their pins hammered further into the hinges than typical, and leaving one end of the hinge looser than the other so that excessive flexing would occur. Jim further decided to modify the lintels on the door frames by adding 3/4” pine routed into strips for edge moldings, in addition to the existing frame moldings, to make them even more fancier. Final adjustments were made to the constructed set pieces to accommodate their mounting places in the venue (e.g., providing surfaces for clamps to be fitted to hold the set pieces in place). Finally, long-time Savoyards seamstress Julia Adams volunteered to build a cushion for the window seat and curtains for the window frames.

These set pieces are currently installed in the Bundy museum annex, and you can see them in person on the first two weekends in April  when the Savoyards company puts on “Arsenic and Old Lace”! As well as the TCMS members and friends already named, long-term Makerspace members Gary Alan Dewey and Leslie-Morgan Frederick are playing two different roles in the play itself. Come and check it out!


https://www.summersavoyards.org/events

Picture credits:
All photos and drawings are provided and owned by “Evil Jim” and Mary Donnelly.

SaveSaveSaveSaveSaveSave

Project Profile: Cliff Burger’s Knives

One of the most heavily-used parts of Triple Cities Makerspace is the Metal Shop, where members can frequently be found using its equipment to cut, mill, and weld to their hearts’ content. The person in charge of this area of the Makerspace is Cliff Burger, a mechanical engineer by trade and an enthusiastic machinist and metal-worker in his spare time! Cliff has worked on many group and personal projects in the Metal Shop for practical purposes, but recently he’s also finished a personal project for fun there – knife-making! He was inspired to do this after seeing some knife-making projects discussed in various online machinist forums, and decided that he wanted to put his personal touch on the general idea.

Cliff has produced two different kinds of knives so far. The simplest kind is one he made from a repurposed coarse wood file, chosen for its appropriate size as a piece of raw material as well as the high quality of its steel. A good knife blade will have a high carbon content, which allows the blade to have a sharper and more durable edge; and good files like the one he used are usually made with a high carbon variety of steel. The second knife was made from a stock piece of steel with a mixture of high-carbon and nickel-based stainless steel components for aesthetic purposes.

The process of making the blades for both knives is largely the same. The first step in the process is called annealing, where the raw material for the blade is heated to 800-1000 ℉ in a miniature kiln or specialty oven. This softens the material enough so that it can be reshaped into the form of a blade. A mill is used to do the three-dimensional reshaping, by trimming away any excess metal from the raw material until what is left is the desired size and shape; Cliff used a special carbide bit in the mill which could easily cut through the still relatively tough steel. The new blade is then given a beveled edge on its appropriate side using a belt sander.

Once the blade has been created, it must be treated to regain its toughness, where toughness is defined as strength of material, vs. hardness as the ability to resist deformation – the former quality is desired for a knife blade, for the sake of having it not break if too much force is applied. Cliff reheated the blade to 1000-1200 ℉, then immediately quenched it in a bucket of salt water (brine). Finally, he placed the blade in a 400℉ oven for an hour, let it cool to room temperature, then ran it through the oven at 400℉ for another hour before letting it cool again. This process is called tempering, which leaves the carbon inside the blade at a high-energy (and very tough) state, even when the blade has cooled to room temperature.

The blade is given a final finish using sandpaper of various grits – starting at 300, and working up to 1000 or 2000 – and a thorough application of polishing compound, so that it looks as awesome as it is tough! The second knife Cliff created especially benefited from the finishing process, as the pattern exposed with the sanding and polishing is gorgeous. Cliff used diamond honing stones to put a fine edge on both knife blades, which should last for a long time even with regular use because of the high strength of the materials. The first knife is currently having a wooden handle created for it out of two separate pieces of wood, called scales, which will be screwed to the butt end of the blade. The second knife has a much finer set of scales made of grade 2 anodised titanium, which Cliff enhanced by milling an artistic pattern into both scales, and by adding a frame lock and hinge to keep the blade extended once opened.

The second knife has been used regularly for every day handyman purposes since Cliff finished making it, and the first will see regular use as a kitchen knife once its scales are finished and installed! Two other members of the Makerspace have shown interest in making their own knives after seeing the ones Cliff made, and he is currently walking them through the process of making kitchen knives from files as he did. Hopefully more people will be inspired by his example to make their own practical and useful tools!

Picture References:

All pictures provided and owned by Cliff Burger and Stephen Welte

Hacking Myself

Electronics and computer-based technologies are integrating into our society at an ever-increasing rate, and – despite the potential for them to be abused – I find myself excited at the possibilities of  what can be achieved with the latest developments in those areas. I am especially fascinated with wireless technology. Unseen energy being utilized to accomplish various tasks using WiFi, Bluetooth, RFID and NFC. It’s like magic to me!

Our Makerspace uses RFID tags to control access to the building. To enter, you scan your tag, enter a PIN (personal identification number) which is verified against the list of access credentials on TCMS’ server, and upon verification a relay is energised to unlock the door. This system benefits the Makerspace in terms of both cost and administration, as RFID tags are cheaper than making keys for everyone and as their use gives the TCMS board the ability to track and monitor the level of activity at the Space. One day I accidentally locked my keys inside the building, and needed to wait to be “rescued” by another member of the Makerspace. I vowed that this would never happen again, and remembered that one of our other members had taken what some would say extreme measures to have an RFID chip implanted into his hand! I had been fascinated by the potential applications of this procedure, which include access controls like normal RFID tags.  The RFID chip used is about the size of a grain of rice, and is sealed inside a glass enclosure.

I decided to take this idea a step further – I would get an RFID tag implanted in one hand, and an NFC tag implanted in the other hand.

The RFID chip was cheap (~ $10) and non-programmable; it contains a unique PIN, which I had entered into the TCMS access credentials system. I use this chip to gain access to the Makerspace now. It is in my right hand, so I “scan” my right hand at the door,  enter the chip’s PIN, and voila – the Makerspace door opens. No more losing tags or keys!

The chip in my left hand is an NFC, or Near Field Communications, chip. This chip cost around $99 from DangerousThings (https://dangerousthings.com/shop/xnti/), and is programmable with my phone using the DangerousThings app (available through the Android apps store at https://play.google.com/store/apps/details?id=com.dangerousthings.nfc&hl=en); I have also found the NFC Tools app to be useful. I used this app to scan and program my chip to protect it against accidental locking, which would make it non programmable.

I have added my chip to the lists of access credentials on various trusted devices so that I can, for example, unlock my phone by scanning my tag (tapping my phone to the back of my hand). I have also used the NFC tools app to program my chip to carry my ‘vcard’, or virtual business contact card, which allows me to transfer my contact information (name, phone number, email address, etc. ) to someone else’s phone by tapping their phone on my hand! Unfortunately this will not work on iPhones, as Apple has restricted NFC functionality to be used exclusively with their iPay app; but Android phones permit it so long as their NFC functionality is enabled.

Building further on these basic applications, I’ve loaded a profile (script and data) onto my chip with a link to my resume, so that if you scan my tag it prompts you to download my resume from my website! So cool – I’d hire me! 😀 Finally, I’ve created and loaded another profile to save my personal emergency information (name, allergies, blood type, emergency contact info), which can be transferred to someone else’s phone in a similar way. I am considering getting some sort of tattoo to indicate the implant’s presence to emergency personnel; if anyone reading this has any ideas about how I should go about doing this, please let me know!

I feel like a spy with this kind of technology literally embedded inside of me! I am excited to see the future of implantable technology development and applications, and cannot wait for the day when I can pay for things by scanning my hand!

Picture References:

All pictures and videos provided and owned by Gary Alan Dewey, except for “Quarter and Transponder”. Dangerous Things. Dangerous Things. 4 March 2018. Web. 4 March 2018.

Project Profile: Maker Robots Mural

Triple Cities Makerspace has been established on the premises at State Street in Binghamton for over a year now. A number of people have devoted an enormous amount of time, effort, materials, and money towards fixing up the building and grounds, and outfitting the facilities with everything it would need to allow people to work on lots of different kinds of projects, from woodworking and welding to electronics and sewing. One important part of this process which has sometimes been overlooked is the furnishing and decorating of the premises; as the success of the Makerspace depends on its forming a dedicated community of enthusiastic creative people, it is important to have the building feel like a safe, comfortable, and welcoming place to be. To that end, Makers have made a concerted effort to paint parts of the Makerspace in warm and vibrant colors, and to donate artistic works or decorations to its rooms.

One of the most prominent artistic projects at the Makerspace to date is the large mural in the main room featuring two robots on a background of several dozen floppy disks. This artistic piece was the brainchild of Leslie-Morgan Frederick, a long-time contributor to and past board member of Triple Cities Makerspace. She was originally asked to create the mural by Drew Lacock, one of the founding members of the Makerspace, as a showpiece highlighting the artistic talent and potential of the TCMS community; he suggested a fan art painting of “Rock’em Sock’em” robots, which Leslie-Morgan extended to the idea of “makerbots”. The intent of this project was to highlight the idea of having a diverse set of people from all walks of life and with different levels of creative experience meet at the Makerspace to work on various projects and to share ideas, knowledge, and creative techniques with one another. As such, Leslie-Morgan’s idea was to have the mural feature two robots reaching out towards one another, not with fists, but with tools to make things – together. The floppy disks were used as a base for the mural to add the idea of the use of technology in making, both old and new.

With the basic idea of the mural conceived, work on it had to wait until the main room’s walls were drywalled and painted, which was done in the final months of 2015 and beginning months of 2016. At that point, the floppy disks were selected by color from a large cache of disks that had been donated to the Makerspace, and were then installed using liquid cement on a wall in the main room chosen for its proximity to the Makerspace’s main entrance and visibility throughout the room. As the rectangular mural base comprised some ~200 disks, arranged from black into progressively lighter and brighter shades of primary colors, this work took a couple of evenings and a lot of work on the part of Leslie-Morgan and a dedicated group of Makers to complete.

She then enlisted the help of her friend and fellow artist Amanda Truin, whose work can be seen on the 2016 Makersgiving potluck dinner invitations. The two artists collected paintbrushes, paints, and a stepladder from the Makerspace’s existing supplies, and set aside a Saturday just after the New Year to create the mural. After a quick discussion with Amanda regarding the intended purpose of the work, Leslie-Morgan quickly sketched out a basic draft of the mural with a pen on a piece of scrap paper, and they set to work together.

The resulting mural took shape as a completely collaborative and organic effort of Leslie and Amanda, whose artistic training and close friendship made the process of working on the project together very easy and fun. They were able to freely communicate various ideas and inspirations for the piece as a whole or in part on the fly, and to criticize and praise each other’s contributions respectfully. They each painted one of the robots after Amanda drew an outline of the entire project, with Leslie-Morgan’s robot (on the left of the piece) having a more illustrative style while Amanda’s robot (on the right of the piece) took on more of a cartoonish, 3-D appearance. Their different artistic styles ended up merging very well throughout the daylong marathon of painting, which was broken up by munching on crepes prepared by fellow Maker Ethan Bexley and the occasional dancing to background music! Room was also made for instantaneous or future additions to the project, such as the golden cube between the robots which is suggestive of a “Mario box”.

The completed mural is a highlight of the Makerspace facilities which makes the building feel much more homelike and comfortable, and is frequently commented favorably on by visitors to the Space. Hopefully it will serve as inspiration for many future artistic creations and collaborations by the local Makerspace membership, and will long serve to commemorate the spirit of communal Making!

Project Profile: Erik Leonard’s Electric Motorcycle

Probably the largest and most significant project to have been developed at TCMS since its inception is founding member Erik Leonard’s electric motorcycle project. Erik has long been interested in alternative energy sources and projects, and after reading about various homegrown electric vehicle (EV) projects online, decided that he wanted to make his own. Due to cost, complexity, and physical size restraints, he decided to try building an electric motorcycle rather than a car. This was still a very challenging project for him in a number of ways, however, as he then had no motorcycle license or riding experience, and despite an extensive background in robotics had never attempted to build or significantly modify any kind of vehicle before.

Erik chose the fundamental components for the first iteration of his motorcycle based on a combination of practical, convenience, and aesthetic reasons. A close friend was willing to sell him a sport bike (Kawasaki Ninja) which he could use as a base platform for a reasonable price; this particular bike has a wide aftermarket for mechanical replacement and upgradeable components, and appealed to Erik’s aesthetic tastes. The Ninja also happened to have a spine or ‘backbone’ frame, which made swapping out the existing gasoline powertrain a relatively easy task and provided lots of flexibility for mounting EV components in different spatial configurations for optimal weight balance, ease of installation / maintenance, and overall design effectiveness. Erik’s online research into other EV projects provided him with a set of equations for calculating how powerful of a motor would be needed to drive the bike, based on the projected weight of the bike + rider, desired top speed, and overall performance characteristics, among other things; after running through the calculations and double-checking his work, he was able to easily obtain a suitable motor from an eBay vendor. His research also put him in direct contact with many other EV creators, one of whom sold him a motor controller sourced from another EV manufacturer (Zero Motorcycles). Finally, the first iteration of the motorcycle made use of secondhand lead-acid batteries purchased from Craigslist for the power source, for reasons of cost and easy maintenance (in terms of swapping individual cells out as needed).

After acquiring all of these major components and putting a lot of time and effort into creating electrical and mechanical designs / layouts for the motorcycle based on these components, Erik started assembling it at the Makerspace’s old facilities in Johnson City. He was able to assemble the motorcycle with relatively few problems due to the extensive design preparation performed ahead of time, although installation of the batteries proved problematic due to their weight and to tight spatial constraints within the square-stock metal frame he’d welded and installed within the Ninja’s existing frame to hold the new powertrain components. He also found that the motor’s wiring was reversed with respect to his expectations, causing the motorcycle to only work in reverse when first turned on. After correcting this and replacing a few defective battery cells, however, he had a working electric motorcycle which he could legally drive around town!

Following an initial shakedown period and a growing enthusiasm for the project, Erik elected to make several improvements to his motorcycle. First, the lead-acid batteries were replaced with lithium-iron-phosphate units, which provided a lot more energy storage and transmission capacity as well as a significant weight advantage, albeit with a considerably higher up-front cost than the lead-acid cells. He chose this battery technology over the more commonly known lithium-ion batteries for reasons of safety, as the phosphate units are less volatile in the event of a crash. These upgrades increased the effective top speed of the motorcycle from 45mph to 70mph, and provided a far greater operating range of 60 miles from the original’s range of 15 miles. Second, he replaced the relatively crude square-stock frame with one designed in CAD software and created with laser-cut panels, which gave more room for the powertrain components and was far better tailored to the Ninja’s existing frame, as well as providing significant weight savings over the old frame. These upgrades were performed at the Makerspace’s current facilities on State Street in downtown Binghamton.

Erik continues to ride this motorcycle whenever weather permits, and gets a great deal of satisfaction from the experience as well as from being able to apply the knowledge and skillset acquired from this project into many others! He is also turning this project into a business venture, working with a fellow TCMS member (Stephen Musok) to launch a “plug and play” EV powertrain module for use in other electric motorcycle retrofit projects. All of the digital design files associated with this project are open-source, so any Makers with the tools, skillset, and ambition can use them to make their own electric motorcycle if they want to; however, given the complexity and level of resources needed to build your own electric motorcycle from scratch, this may be very difficult for the average Maker. Erik wants to make the electric motorcycle retrofit process a relatively simple and more accessible one! He is currently exploring packaging options for the powertrain module to make it compatible with the frames of various other popular motorcycles, and (with Stephen) speaking with various local organizations regarding manufacturing and selling a few motorcycles based on his current designs. His project looks to have a bright future, and the Makerspace is proud to have provided it with a home during its genesis and subsequent modifications, and to have Erik as a member!

Based on an interview conducted with Erik Leonard on 3/10/2017. All photos in this blog post are the exclusive property of Erik Leonard, and are used here with his permission. For more information on the electric motorcycle powertrain retrofit kits, please visit http://www.nextwavemotors.com.

Drinkbot DIY project!

Hello!

One of the coolest projects yet to emerge from the Triple Cities Makerspace is the Drinkbot, a Raspberry Pi-controlled fluids pump and mixing system which allows you to create a beverage from up to six different sources of fluid, as set up by its web server-hosted frontend. You can read all about it in the website linked below, including schematics and parts information:

Drinkbot

Keep on making! 😀


The Basics of Cryptography, part 1

Encryption has been a buzzword in the technical world for the past few decades; but in light of recent events, such as the San Bernardino terrorism case, encryption has become important to the average person as well. Encryption is a procedure for taking ordinary information (known as plaintext) and converting it into an unrecognizable format (known as ciphertext). The history of encryption can be traced back as far as Julius Caesar, who used a substitution cipher (as shown in picture 1, below). A cipher is a pair of algorithms used to encrypt and decrypt data, like an equation. In a substitution cipher, you substitute characters in your message with other characters using some sort of scheme. In this way, Caesar would send encrypted messages to his army. For example, let’s say the substitution key is 3, so each letter is shifted to the right by 3. Using this key, “hello reader” becomes “fcjjm pcybcp”.

As you may be able to tell, this cipher is vulnerable to an attack known as frequency analysis or pattern words. In this attack, the most frequent letters are tallied and matched up with the most frequently used letters in the alphabet; with enough pattern-matching, the substitution key can usually be derived.

Another classical cipher used was the transposition cipher, where the letters are rearranged somehow to jumble the plaintext. A modern example of this which you may know is “pig latin”, where you take the first syllable of a word and move it to the back to form a new word.

The Greek military is also thought to have used stenography, which is hiding a message in plain sight. They did this using something called a scytale: they would wrap a parchment around a wooden rod, write their message on the parchment, then unwrap the parchment and add letters in between those already written (see picture 2, below). Only someone with an identical wooden rod would be able to decipher the message. Another example of early stenography was tattooing a message on a slave’s shaved head and waiting for the hair to grow back to cover up the message.

Skytala
Skytala

Stenographic methods have become increasingly complex over the past couple of millennia, with forms like invisible ink, microdots, and hiding information in the compressed space of music files (as seen in the tv show Mr. Robot) becoming popular. Another common method is to store your secret information in a photo file, since these files are also compressed and do not require all the bits to recreate the photo.

These methods of concealing information for secure communications are apart of a larger family of study called cryptography, which in Greek translates to hidden or secret writing. A fairly famous example of cryptography is the Enigma device, used by the German military during WWII to send secret messages. The large computer systems developed to help crack the Enigma code helped usher in the modern age of computers. Fast forward to today, and cryptography is used every day by ordinary people, not just spies and military personnel. Online banking and credit card transactions, email, electronic voting, anonymous web surfing, regular web surfing and social media are all areas where modern cryptography is used without many people ever realizing it.

In the information security world, there is a principle known as the C.I.A. triad, which stands for Confidentiality, Integrity, and Availability. Confidentiality is the ability to keep your information safe and secure from unauthorized entities, which can be equated with privacy. Integrity deals with the consistency, accuracy, and confidentiality of your data. Availability is just what it sounds like: having your data or services available to you and whoever else needs access at all times.  Cryptography can aid in confidentiality and integrity. As we have discussed earlier, encryption supports confidentiality by ensuring your message/data is not readable by an unauthorized party. Integrity is supported by using various cryptographic algorithms to ensure data has not been tampered with or altered; i.e., the original data is put through an equation to derive an ‘answer’, which you receive a copy of. If you then receive a copy of the data, put it through the same equation, and receive a different ‘answer’, your integrity check fails. These checks are sometimes known as hashes, of which there are various types depending on the algorithm used. They are used in a wide variety of applications, e.g. proving the integrity (lack of tampering or file corruption) of files downloaded from the Internet by checking them against their authenticated hashes or checksums.

Modern cryptography for confidentiality can be divided into two categories: symmetric key cryptography and public key cryptography. Symmetric key cryptography uses the same password or passcode to encrypt and to decrypt the data. This can be a security concern because of low confidence regarding secure sharing of the password. It may be a decent algorithm / scheme to use to encrypt data for your own use, which is what most full-disk or file system encryption systems use, but it’s not recommended for use when sharing data among multiple users. This scheme may be used to encrypt multiple kinds of devices: laptop hard drives, phones, tablets, flash/thumb drives, individual files, and so on.

The preferred method used to encrypt data shared among multiple users is public key encryption, which uses two different keys: a public key and a private key. The public key is just that, public; it’s the key you give to any other user, and can be publicly known. The private key is also just that, private, and is related to the public key in a way such that it can decrypt something encrypted with the public key. Anyone can encrypt a message for you using your public key, which you can then decrypt with your private key, which nobody should know except for you. Public keys can be also digitally signed by other users with their private keys, which means the people that have signed the key have verified the key owner’s identity. This creates a web of trust. Let’s say Don trusts/knows Bob but not Alice; since Bob trusts/knows Alice, Don inherently trusts Alice’s key/identity due to his trust of Bob.

A good example of a public key encryption system is GPG (GNU Privacy Guard), a free replacement for PGP (Pretty Good Privacy), as PGP used to be free but was bought by Symantec. GPG public key encryption can be used to encrypt email messages and files, and also has some built in features for integrity (verification of user identity). For example, let’s say Alice wants to email Bob a secure message. Alice could look up Bob’s public key from a public key server, or get it directly from Bob and use it to encrypt her email to Bob. She then digitally signs her message using her private key. When Bob receives the email, he decrypts the message using his private key, and verifies her digital signature using Alice’s public key.

Thank you for joining me for a brief history and overview of cryptography and encryption! Stay tuned for future blog posts where I hope you will join me as we explore cryptography and encryption in more detail. You will learn how to better protect yourself and your data in today’s computer age.


Text References and Resources:

“Cryptography: History of cryptography and cryptanalysis.” Wikipedia.org. Wikipedia, 25 July 2016. Web. 1 Sept. 2016.

“GNU Privacy Guard.” Wikipedia.org. Wikipedia, 15 Aug. 2016. Web. 1 Sept. 2016.

“Outline of cryptography.” Wikipedia.org. Wikipedia, 21 July 2016. Web. 1 Sept. 2016.


Picture References:

Skytala. Digital Image. Wikimedia Commons. Wikimedia Commons. 16 Feb. 2007. Web. 1 Sept. 2016.


Resources:

The Electronic Frontier Foundation, https://www.eff.org.

TCMS at the Rochester Mini MakerFaire!

On Saturday, November 19, 2016, the New York State Association for Computers and Technologies in Education presented Rochester Mini Maker Faire at the Rochester Riverside Convention Center.  A few of us from Triple Cities Makerspace were lucky enough to be in attendance.


As we entered down the escalator, we were greeted with a large display announcing that the Mini Maker Faire was taking place and showing rotating lists of presentations.  We quickly entered the convention floor and were greeted by interactive exhibits from the Rochester Museum and Science Center.  Working our way towards the main exhibit hall, we came across the Snowbelt Morris dance group performing, followed by a number of FIRST Robotics groups showing off their projects.

We entered the main exhibit hall and were greeted by a large room teaming with artisans, crafters, and makers of all kinds.  In front of us was a group of artisans that built their own thematic miniatures out of pipe cleaners.  We continued to walk through to a side room, passing the Recorder Society recital. In the side room was a guitar pick manufacturer laser cutting picks while visitors waited, a music education product, and a number of hands-on activities for children.

We made our way back to the main exhibit hall and saw a few artisans with hand-made soaps, walked past a portable screen-printing system (with free takeaways!).  As we continued to wade through the amazing group of makers that had assembled to view and present, we discovered the myriad of makerspaces and university-affiliated programs from the Rochester area showing off their projects and wares.
The faire brought the spirit of making to those in attendance and we saw more than one group of children excited about what some may consider ‘little things’ or everyday items. Some groups showed what could be made with model trains and K’Nex, others were showing new software approaches to problem solving, and others were showing what talent can do when combined with basic artistic materials. In all, it was a wonderful event and we thank The New York State Association for Computers and Technologies in Education for putting it on. 

A History of Aircraft Simulators in the Triple Cities

Link’s “Blue Box” – the first aircraft training simulator

Many people who live in Binghamton are aware of the long history of technological research, development, and manufacturing work done locally by companies like IBM, General Electric, BAE, and Lockheed Martin, with many cool products in the computing and military realms being developed here. It is often forgotten, however, that some of the first aircraft simulators ever created were developed here by a local entrepreneur named Edwin Link!

The son of a pipe organ manufacturer, Link developed an interest in flying in the 1910’s, and began taking flying lessons around 1920 or so. Frustrated by the lack of any devices that could provide training for potential fliers before stepping into a cockpit, Link worked with engineers and mechanical assemblers from the Link organ factory in the late 1920’s to design and build a mockup of a then-contemporary airplane cockpit with controls operated by air pressure from a bellows adapted from those used in the Link pipe organs! This cockpit was mounted on a platform which could move in three dimensions – tilting forward or back with the pitch control, rolling left or right with the roll control, or yawing horizontally left or right with the pedals. This motion of the platform, tied with input from the pilot into the corresponding controls, provided a simulation of the motion of an aircraft in flight, in three dimensions; this concept is still key to realistic (FAA-certified) flight simulators in use today by commercial or military pilot training schools.

Link initially manufactured a few for use at amusement parks or for training at local airports (including Endicott and Cortland), but saw the potential for widespread commercial application as the market for airplanes outside of the military and stunt/barnstorming markets increased; and he began promoting his simulators around the country. His commercial breakthrough came when the U.S. Army Air Corps (which would become the Air Force after WWII) began transporting air mail for the U.S. Post Office in 1934, and experienced many fatal accidents when new pilots encountered inclement weather or other unfamiliar flying conditions. Link demonstrated his simulator to officials from the Air Corps, and they were sufficiently impressed by it – as well as by Link’s ability to fly in hazardous weather using instruments and training acquired through use of his simulator – to place an order for 6 trainers. When the pilots who trained using these simulators demonstrated remarkably improved abilities compared with their peers, the Air Corps ordered more, and Link’s fledgling Link Aviation Devices company began producing the little “Blue Box” simulators (as they were nicknamed) from their factory in Hillcrest, just north of the city of Binghamton. The onset of WWII and the success of the Air Corps’ training using these simulators convinced the U.S. and U.K. militaries to order thousands of them, and Link’s simulators were soon seen as essential for use in training military pilots. As the commercial aviation industry expanded after the second World War, initially using some of the same aircraft used by the Allied forces and flown by ex-military pilots, Link expanded into this field as well, and became the preeminent aircraft simulator manufacturer for the next three decades, providing training equipment for governments and corporations around the world and even supporting special projects like Lockheed’s SR-71 Blackbird and NASA’s Apollo program.

After corporate mismanagement, international competition, and a hostile takeover resulted in the dismantling of Singer-Link (the successor to Link Aviation Devices) in the late 1980’s and early 1990’s, several companies picked up the pieces and continued the legacy of aircraft simulator design and manufacturing, including L-3 Communications, which still has a presence in the Binghamton area today and is responsible for the creation and maintenance of aircraft simulators for programs like the United States Air Force’s C-17 cargo planes. Several other companies in Binghamton also thrive on the legacy of Link’s simulators, including KRATOS Technology and Training Solutions and Simulation and Control Technologies – both of whom design and manufacture aircraft simulators in the Binghamton area – and BAE and Lockheed Martin, who use aircraft simulators created by companies like these to develop avionics hardware and software for commercial and military applications in Endicott and Owego. Decades after Edwin Link was inspired to find a better way to teach himself how to fly, the technological field he pioneered is still a vital part of the training processes for thousands of pilots around the world, and is still a major component of the Triple Cities’ economy.

Sources:

“Link, Edwin Albert”. Nationalaviation.org. The National Aviation Hall of Fame, 31 Oct. 2016. Web. 3 Nov. 2016.

“L-3 Link Simulation & Training: History.” Link.com. L-3 Link Simulation & Training, 31 Dec. 2012. Web. 3 Nov. 2016.

Tomayko, James E. “Crew-training simulators.” NASA.gov NASA April 1987. Web. 3 Nov. 2016.