Project Profile: Magic Wheelchair Costume

Members of the Triple Cities Makerspace recently completed the largest group project undertaken at the Space in quite some time, in collaboration with the Magic Wheelchair organization and an independent artist in Cortland, NY named Crystal Lyon. This project was the creation of a Halloween costume for a child afflicted with cerebral palsy, who lives with his family in Cortland. The child, Jacob Eldred, has never been able to take part in any Halloween festivities due to his condition, although he has always wanted to. His family contacted Magic Wheelchair, an organization which works with local artist, makerspaces, and families of children like Jacob around the United States to create costumes for disabled children according to the children’s preferences and interests, to see what could be done for Jacob. In turn, a Magic Wheelchair representative named David Vogel spoke with Crystal Lyon (as a prominent Cortland artist interested in such activities) and Erik Leonard (as the president of the nearest makerspace to Cortland) regarding the creation of a costume for Jacob; as Erik was then preoccupied with other TCMS affairs, he turned over the matter to long-time TCMS friend Amanda Truin, who acted as project lead and as a liaison between Jacob’s family, Crystal L., David V., and a variety of TCMS members who agreed to work with Amanda to create a costume for Jacob.

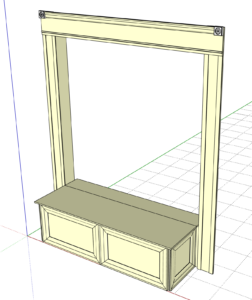
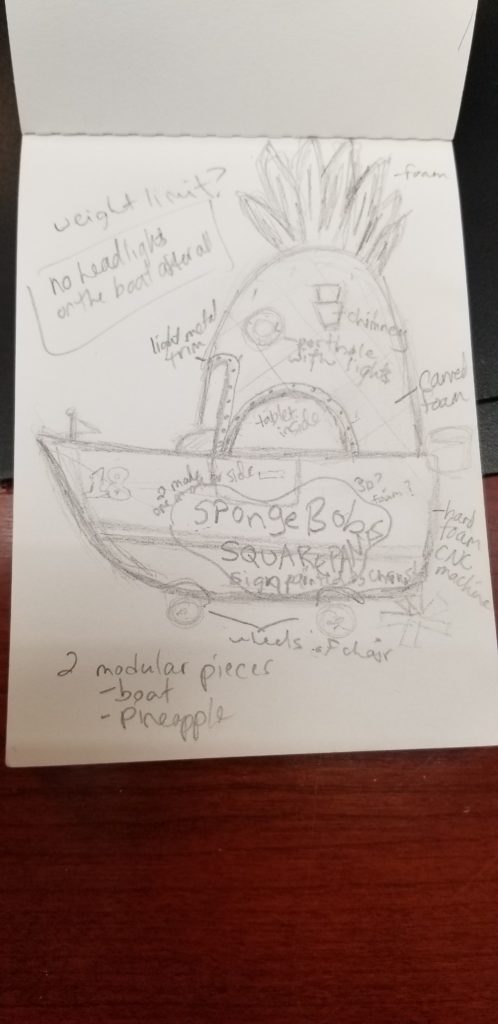
Following perusal of the costume-creation process documentation and personal profile of Jacob passed on by Magic Wheelchair, Amanda, Crystal, and Cliff Burger (TCMS vice-president) conducted a more in-depth interview with Jacob and his family regarding Jacob’s interests and likes/dislikes. As one of Jacob’s favorite TV shows is “SpongeBob SquarePants,” Amanda was inspired with the idea of creating a costume combining two iconic objects from the show (SpongeBob’s pineapple home and boatmobile), as it would be a visually striking costume that had not been done by any other Magic Wheelchair team project. This costume idea would incorporate sound clips from the show, LED lights, and feature colorful paintings and decorations evocative of the TV show. After Jacob and his family indicated their approval of this design idea, Cliff obtained measurements of Jacob’s wheelchair, including points where the costume could be attached to the wheelchair, and set about creating a CAD model of a basic structure for the costume.

Amanda’s design concept sketch

Following this meeting and the creation of design models and sketches by Cliff and Amanda, they sat down with other TCMS members – including Erik and Ethan Bexley – to decide upon a timeline for construction of the costume and assign design or construction tasks to specific people. Ethan took the time to create a project in Asana (a work-management software
platform) to coordinate task assignments and management among the team members, as well as to facilitate the sharing of files pertinent to this project; this made organizing the initial stages of the project much easier than otherwise, especially when the initial timeline was shortened with the goal of completing the costume by the time of the annual Cortland Halloween parade.

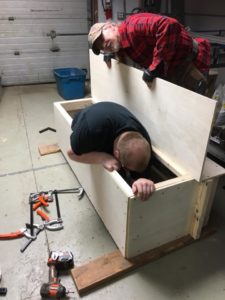
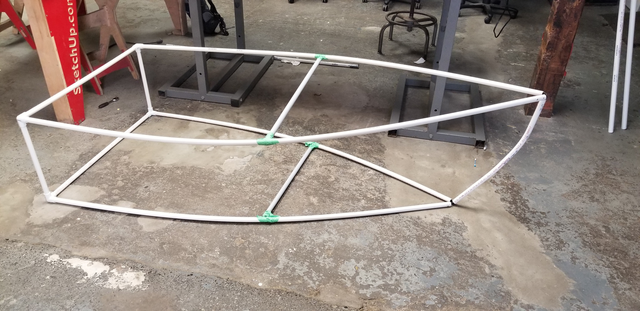
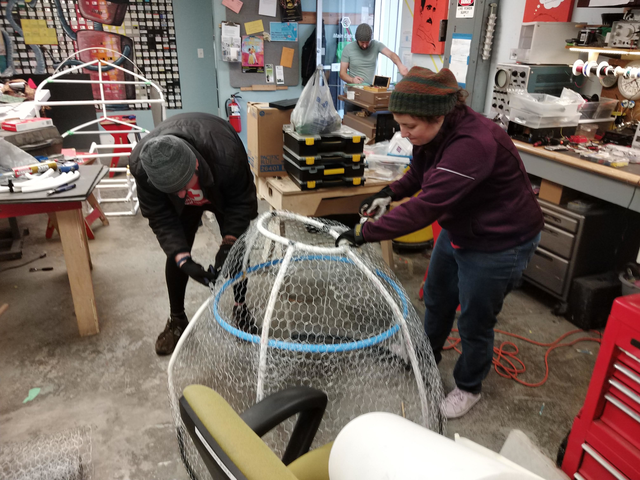
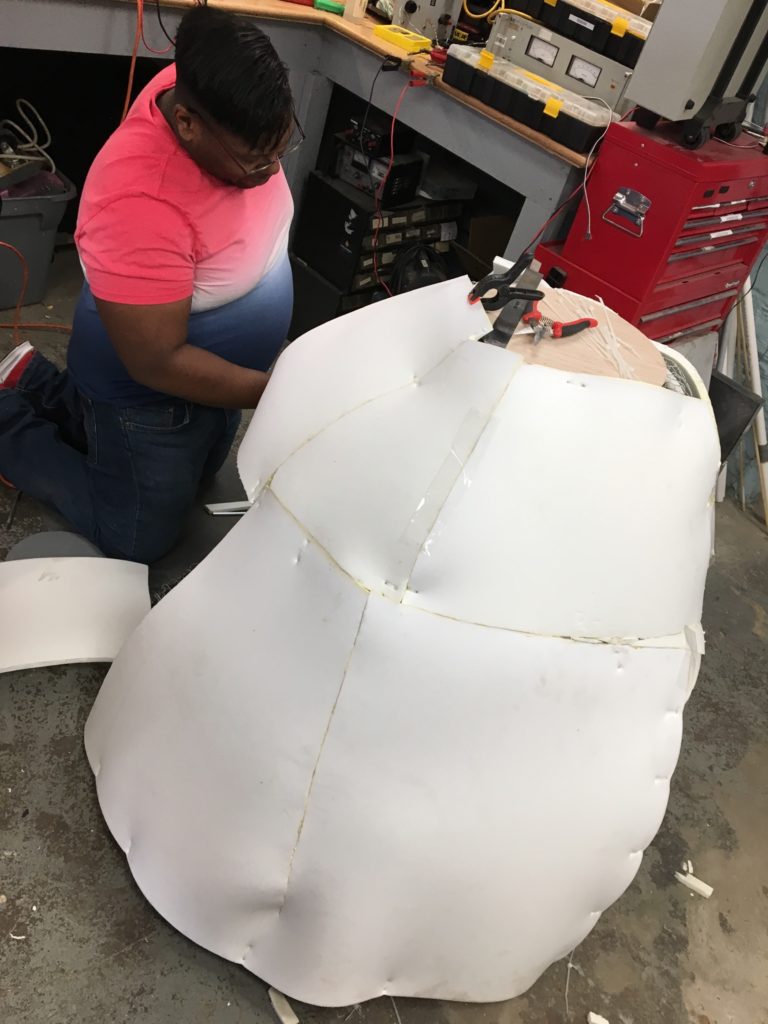
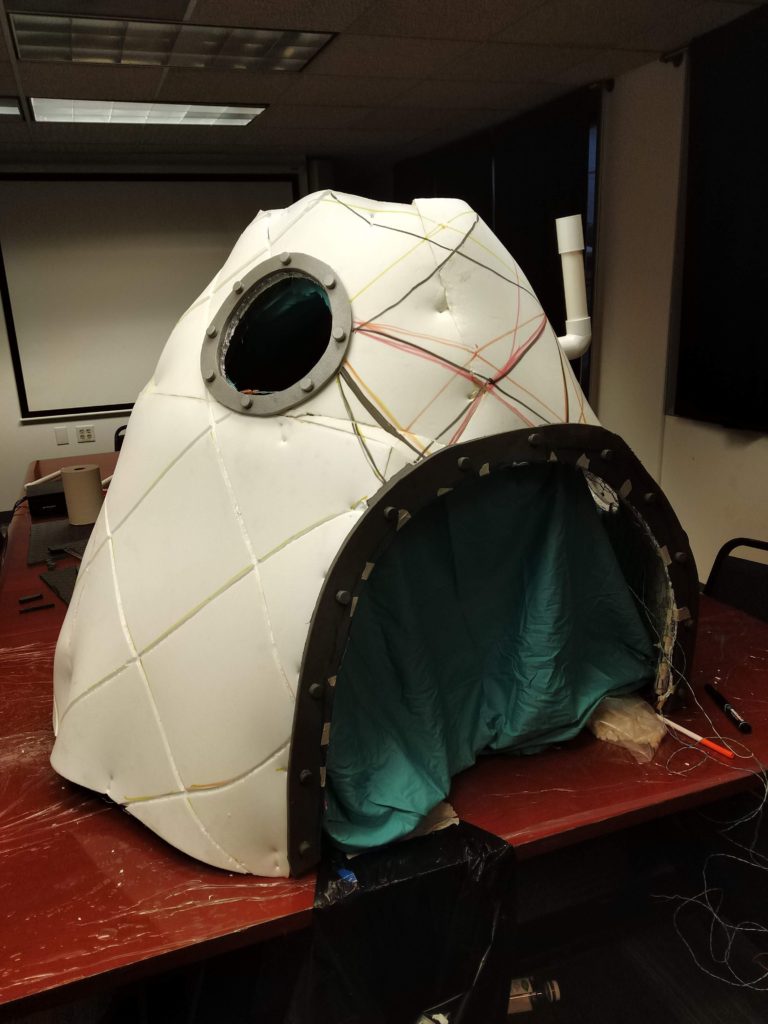
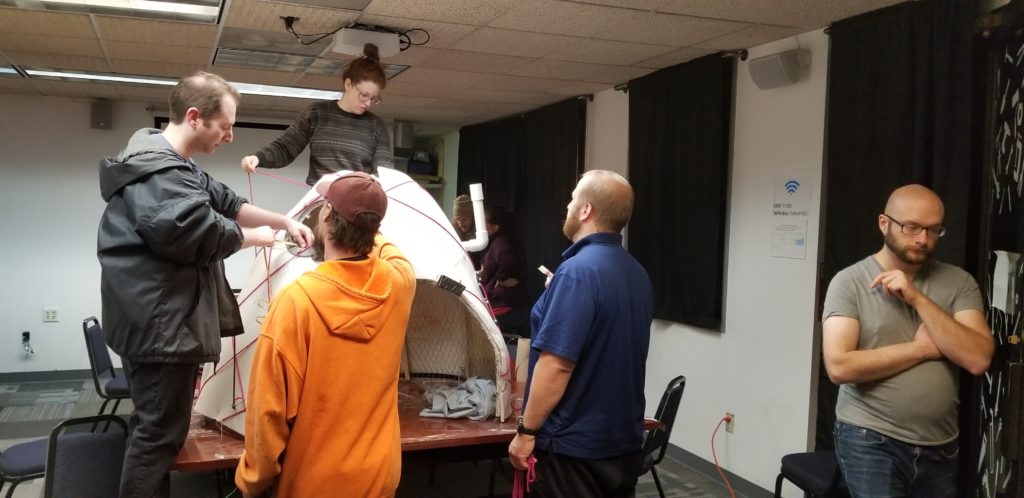
The heart of the costume is its structure; this was a somewhat improvised affair based on Cliff’s design models, constructed with the goal of being strong yet lightweight and made from inexpensive and easily-obtainable materials. The structure of both the pineapple and boat portions of the costume is largely made of PVC pipe, lightweight foam sheets cut to size, and chicken wire, all held together with various adhesives, zip-ties, and screws. The pineapple even has an unexpected element in the use of a hula hoop to help form its rounded shape! Two major challenges encountered during the structural construction process were the organic shapes of the pineapple and boat, being non-conducive to construction with building materials intended for rectangular objects, and incorporating the mounting points assemblies of and access to the wheelchair into the structure in such a way that the costume could be attached / detached to and from the wheelchair with relative ease. These challenges were overcome using innovative construction techniques including bending PVC pipes into permanent curved shapes using a heat gun and sand dispersed inside the pipes to prevent excessive heat buildup in any one place, which would result in structural weaknesses, and making use of chicken wire as a structural element for the pineapple (as a pineapple is a very unconventionally-shaped structure). The makers even 3D printed fittings for the PVC pipes when conventional sizes would not work for what was needed. Many long hours were spent acquiring materials, assembling, and reworking the structure during this phase of the costume’s construction.

Preliminary boat structure (before additional bracing was added)
Pineapple structure being assembled
Both structures temporarily connected for fitment purposes
Pineapple structure being covered with foam

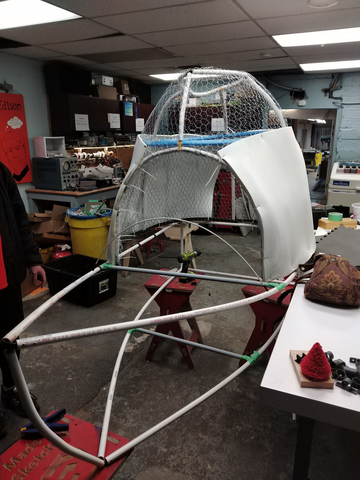
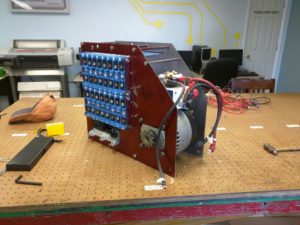
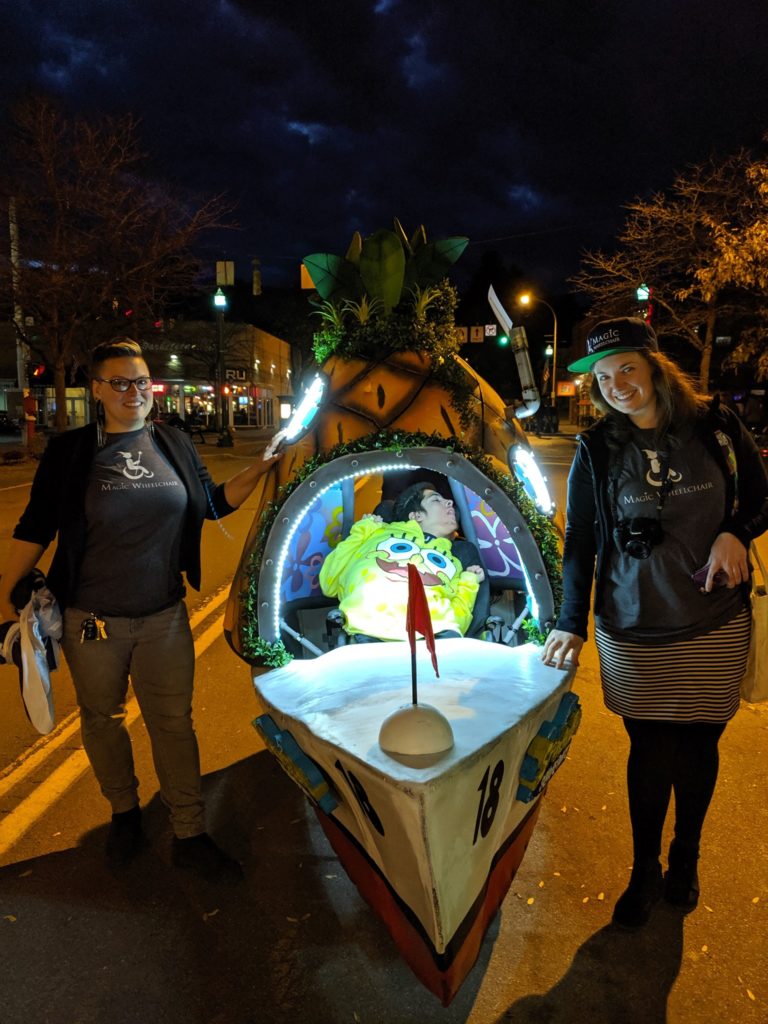
While the structure was being assembled, Adam Biener worked autonomously to devise the electronic circuitry and software used to provide LED lighting and sound effects for the costume. He created, tested, debugged, and reworked the circuits, controls, and software until it was fully functional, tailoring the sound effects used to Jacob’s specific preferences and creating a special control handle which Jacob could manipulate to activate the lights and sound effects. The electronics assemblies were mounted in the rear of the boat’s structure, and the LED lights were attached to the pineapple structure, with final wiring being done once the two structures were connected to one another. Enormous credit is due to Adam here for successfully undertaking almost the entirety of this portion of the project on his own, with some additional help from John Sheak.

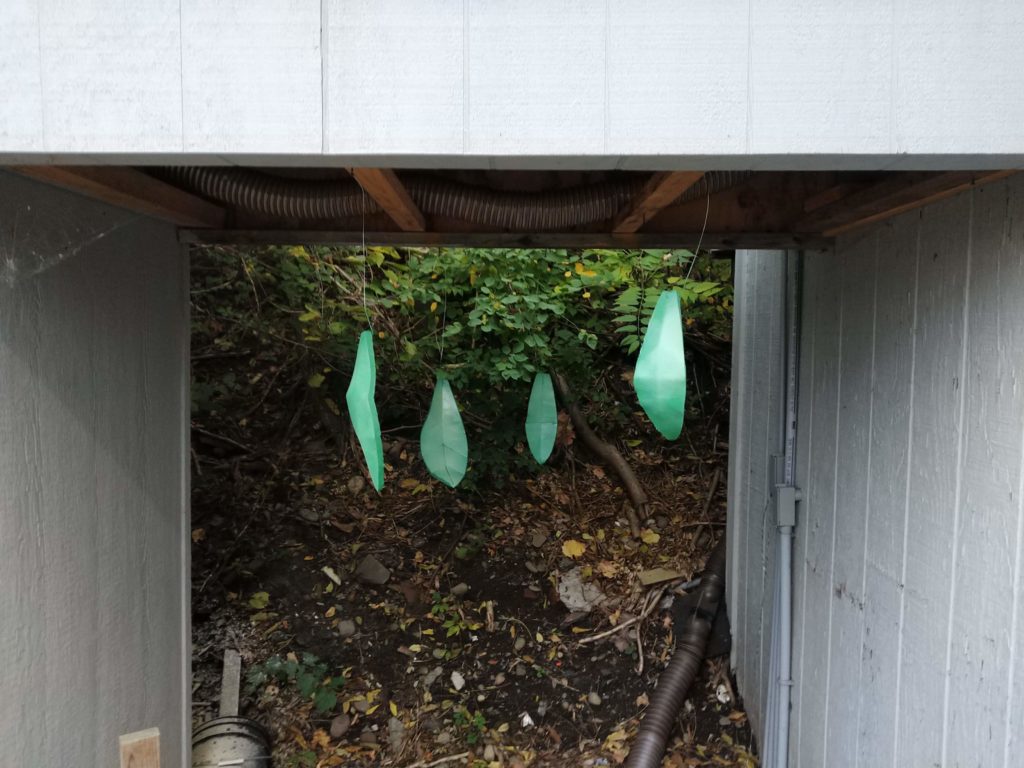
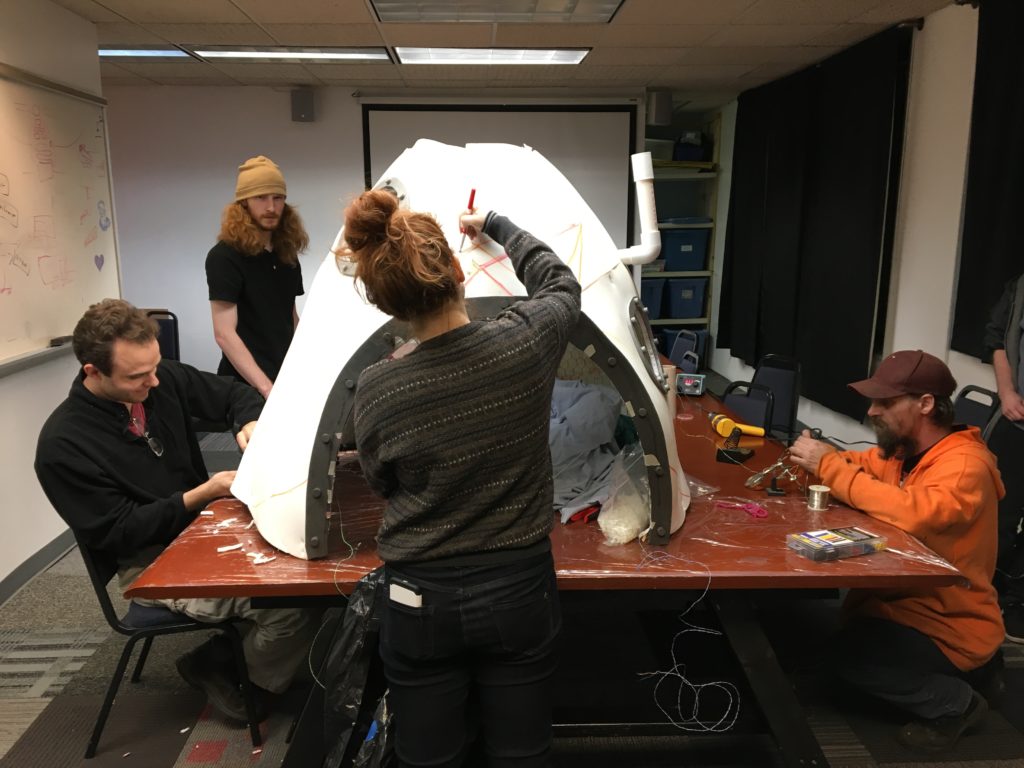
Once the structures were largely complete, Amanda began decorating the pineapple and boat with help from several other TCMS members (credited at the bottom of this blog post). The pineapple and boat structures, each covered with foam, were sanded and painted with several layers of primer and paint, with the pineapple’s foam having been scored with knives to have the texture of an actual pineapple. Special painted highlights in lighter colors were added to various portions of the pineapple, and the scored foam was shaded to give it the appearance of depth and realistic coloring. Foam leaves were cut, shaped, and painted before being attached to the top of the pineapple, and plastic decorative vegetation resembling seaweed was
strewn around the leaves and top of the pineapple to give it the appearance of having been underwater for some time. Amanda painted the interior of the pineapple extensively with various floral and other TV show-appropriate decorations so that Jacob would have cool things to look at when inside the costume, and feel like he was inside SpongeBob’s “real” pineapple! Amanda and Crystal added a final painting element to the boat following the first fitting with Jacob’s family, as Crystal had been assigned the autonomous task of carving the logo for the show out of foam and painting it for the purpose of having an additional visual element on the sides of the boat as well as having some color to liven up the boat.

The pineapple structure, being scored and decorated
The leaves being spray painted
Decorating the pineapple structure
More decorating of the pineapple structure, and fitting the LED strips to the structure’s openings

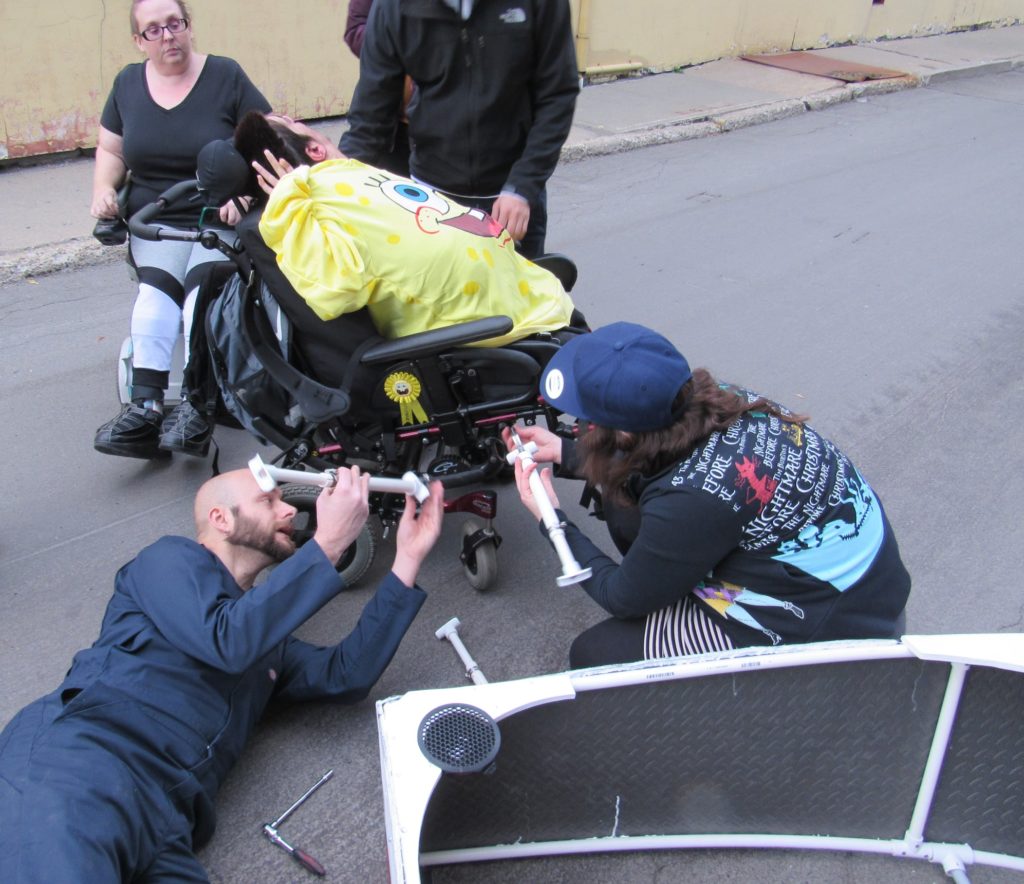
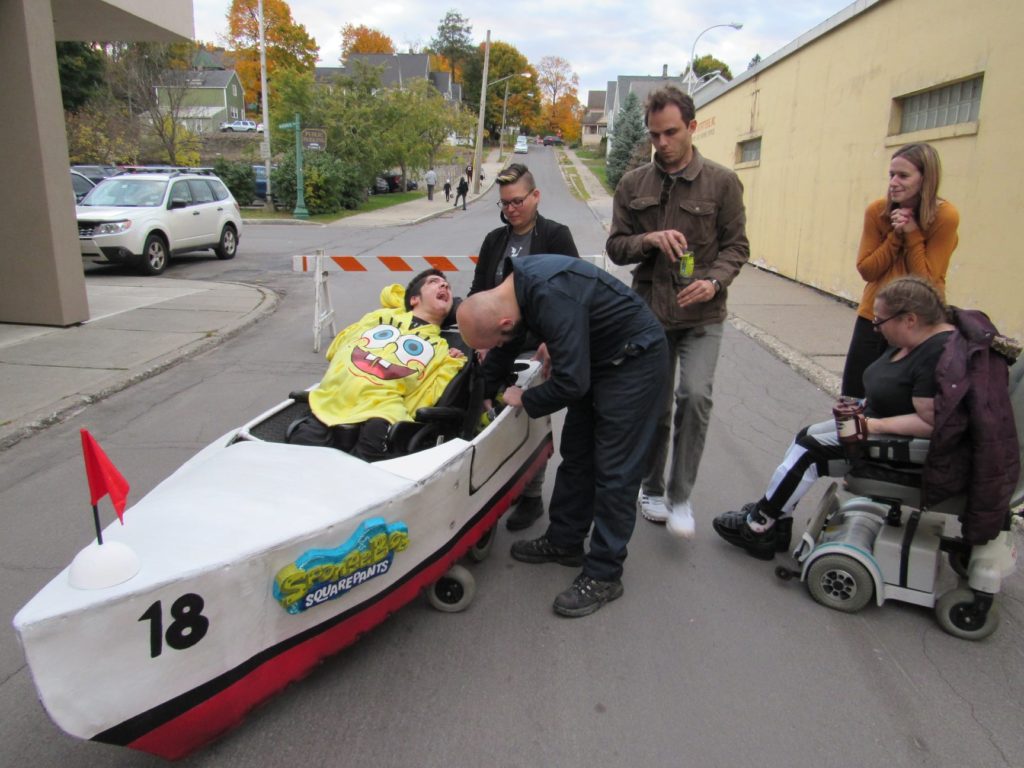
Completion of the costume by the revised timeline was achieved after many long evenings and weekends by everyone involved. Amanda coordinated test-fitting of the costume to the wheelchair with the family and with help from Erik and Cliff; the costume was introduced to Jacob on the day of the parade, and it was attached to the wheelchair with Jacob inside the costume
before he and the family took part in the parade, accompanied by Amanda and Crystal. The costume won first place in the family costume category for the parade, which meant an enormous amount to the family as it was Jacob’s first time participating! The costume remained with the family afterwards; the pineapple was mounted over Jacob’s bed, and his favorite bean bag was put inside the boat as a place for him to watch episodes of “SpongeBob” in! Jacob and his family felt very cared for and happy as a result of all of this, which was the main overall goal of this project and of the Magic Wheelchair organization as a whole.

Assembling the costume supports on Jacob’s wheelchair
Securing the boat portion of the costume to the wheelchair
….and the costume has been assembled on the wheelchair!
Crystal and Amanda with Jacob in the finished costume, in the parade!

All in all, this was a very special project that ended up coming off very well for everyone involved despite the logistical, construction, and timeline challenges encountered along the way, and the lack of familiarity by various project participants with the kinds of design and construction tasks required of them. Special thanks to Amanda Truin for her mature and cool-headed project coordination and for the many long hours spent with every phase of the project, especially the painting and decorating portion; Cliff Burger for making accurate structural models and contributing to the costume’s structural construction, Ethan Bexley for organizing the project
efforts via Asana and for his invaluable contributions to the structure’s construction; and Erik Leonard for helping with every phase of the costume’s construction and handling logistics of costume transportation and setup. As well as these project members, the following members also helped out with ideas, construction, painting, logistics, and/or other work to make this project a success (sorted in descending alphabetic order of last name):

Eric Adler
Adam Biener
Zach Brown
Gary Alan Dewey
Bill Dikeakos
Leslie-Morgan Frederick
John Sheak
Stephen P. Welte

Photos supplied throughout this blog post are the property of and have been supplied by the various TCMS members and friends credited throughout the blog post. Please contact the TCMS board before using any of the photos here for any purpose outside of this blog post.

Project Profile: Built-In Closet Cabinetry

Erik Leonard has been a proud Binghamton homeowner for a couple of years now, and in that time has substantially remodeled many different portions of his house. One recent project of his was reworking the closet in his bedroom, which was large but not easily accessible and had a lot of unusable space. Erik wanted to make better use of this space within a reasonable budget, and as a Maker decided that he would try to make his own built-in closet organizer based on his specific needs and preferences.

Existing closet of messy sadness

Erik started this project by drawing up some rough sketches of what he wanted in terms of clothing organizational concepts, then refined his initial ideas and sketches using the dimensions of the existing closet which the cabinet would be installed into. Specifically, he took the existing closet clothing rod as the highest dimension for any clothing inside the cabinet, then measured the length of his suit and added 3″ for clearance below the suit to get a vertical dimension for the portion of the cabinetry where clothing would be hung. He also decided to make this and all other portions of the cabinet take up the full width of one of the existing closet doors, to make the best use of the space available to him.

Next, he set the bottom of the cabinet on the floor, then measured a foot plus an inch vertically to create an open space for using IKEA clothing organizer cubes, which measure approximately 12″ in all dimensions. Finally, he took the remaining vertical space within the cabinet, divided it in two, and called the resulting dimension the height of each of the two drawers to be created and installed between the two open spaces in the cabinet. The screenshots below illustrate this design process, which culminated in detailed SketchUp designs used during the process of cabinet construction:

Initial cabinet sketches
Refining the dimensions of the cabinet

Once the design of the cabinet had been finalized, Erik created a list of materials and set about shopping for them. Most of the cabinet is constructed of 12 or 18mm sande plywood, which is extremely dimensionally accurate and strong but cannot be stained, as it contains divots filled in with wood putty; as Erik intended to paint the cabinet once constructed, this was not a problem for him. He specified 18mm plywood for the cabinet’s perimeter surfaces and internal dividers, and 12mm plywood for the cabinet back and drawers; all seams were connected using wood glue and/or standard wood screws using pocket hole joinery. All remaining components were sourced from the Home Depot (full-extension drawer slides, rated for 250 lb.), IKEA (the drawer pulls), Amazon (RGB LED strips to illuminate the cabinet interior), and AliBaba (an LED controller for the LED strips).

Once all of the cabinet components had been purchased and transported to the TCMS wood shop, Erik set about assembling the cabinet, using various YouTube tutorials and woodworking blog posts for information and ideas regarding cabinet assembly. He devoted a great deal of time and attention to making each of the plywood pieces cut to accurate dimensions per his design, which made the cabinet assembly process much easier. One design change made in the process was changing the LED strips’ mounting method from routing them into the top of the cabinet – which proved to be extremely time-consuming and difficult – to making use of extruded aluminum LED strip holders, which have built-in light diffusers and easily clip together around the LED strips before themselves being screwed to the top of the cabinet, as shown in the second and third screenshots below.

Cabinet shell constructed
First partition and drawer installed, with LED strip holders mounted in the top of the cabinet
Close-up of mounted LED strip holders

Creating and installing the drawers with their fascias proved to be one of the most time-consuming portions of the project, for the sake of making sure that the drawers consistently opened and closed smoothly and because of Erik’s desire to hide all of the fascia fasteners where possible. Once these were finally assembled and fitted, the drawers were temporarily removed from the cabinet, and everything was painted with multiple coats of a white, semi-gloss urethane alkyd enamel.

Both drawers installed, fascias not shown
Painting in progress

Once the paint had dried and the drawers re-installed, Erik enlisted the help of TCMS secretary Stephen Welte to help him transport the cabinet home and into his house. Once this was done, Erik was able to install the cabinet into his closet after temporarily removing some trim pieces around the closet for greater clearance, and screwed the cabinet into the closet structure with several screws which he subsequently concealed behind the cabinet’s drawers or with wood putty (sanded and re-painted afterwards). The LED strips, whose wiring had been concealed in a channel within the top of the cabinet, were connected to their controller (located on top of the cabinet), and the controller in turn plugged into an existing outlet within the closet.

The finished closet cabinet, installed and populated
Shiny LED awesomeness!

Erik is very happy with the final results of this project, and plans to eventually create another such cabinet for the other half of his closet to make better use of the space there!

All drawings, designs, and photos courtesy of and property of Erik Leonard. Wikipedia cited for page describing the concept and methods of pocket-hole joinery for woodworking projects.

Project Profile: Access Control System (ACS)

Introduction

Access Control Systems (ACSs) are used by many organizations, whether commercial or non-profit, as a means of providing scalable access to facilities or systems with finer degrees of control and fewer physical management problems than keys. When Triple Cities Makerspace (TCMS) moved into the old Spool Manufacturing building in Johnson City, NY back in 2013, the board wanted to provide members with 24/7 access to the new facilities using RFID tags and a computerized tag management system, as opposed to making use of physical keys which are easy to lose and hard to track.

The first attempt at a homegrown access control project started with a single Arduino Atmega 2560 microcontroller board, a numeric keypad with a built-in RFID reader, and a circuit board of relays for controlling an electronic door lock. TCMS had all of this hardware at hand already, but no software to make the system actually work, and off-the-shelf systems weren’t really an option with the minimal budget available. Two then-new TCMS members, Adam Biener (a software developer / consultant) and Evil Jim Ulrich (an expert in, among many other things, Arduino and analog electronics), volunteered their skillsets to the board to make a fully-functioning access control system from the hardware just described and software created by Adam.

The first step in developing the ACS software was to figure out what TCMS really needed regarding access control capabilities. After thinking for a while and getting feedback from the TCMS board, it was decided that the ACS needed to have:

  1. An easy way to add, remove, and edit the info of TCMS members
  2. An easy to way to assign and re-assign RFID tags to a member
  3. An easy way to enable or disable building access based on membership status, with membership status determined by whether or not the member in question has actually paid their dues
  4. The ability to restrict access to certain tools that required basic usage and safety training, such as table saws and other large power tools; a member will get access to said tools when they complete the training

Phase 1: Initial Implementation with Door Access

Adam developed a PHP and MySQL-based web app to implement the requirements listed above which, in supplemented form, is still in use by TCMS to the present day. This app allows users to be added to the ACS, integrates with the TCMS billing system, and includes a way for Evil Jim’s Arduino code to query the user database and control the door lock based on the user-specific information retrieved from this database. The basic architecture of this system is shown in the diagram below:

At the center of this system is the MySQL database which maintains the user list, access rules, and some other settings. The web app allows a TCMS administrator (typically board members) to maintain and update this information. There is also a REST API layer that allows other devices (doors, tools) to authenticate users and enable other types of machine-to-machine communications; since tool access was part of the long term plan for the TCMS facilities, the ACS was designed to accommodate this functionality. A TCMS administrator can define a selection of “devices”, which may include a door or a tool, with each device having a different set of access rules that determines user-specific accessibility. Access to the TCMS main entrance requires a PIN and the scanned RFID tag, but tools only require use of the RFID tag. Finally, automated offsite backups of the ACS data were implemented to allow recovery from catastrophic failure, like a bad hard drive.

ACS Implementation, Phase 1

Implementing ACS functionality to the TCMS facilities’ main entrance was the highest priority in terms of system deployment, so Adam and Evil Jim started with that; following the usual round of hardware and software testing, the system was implemented on the TCMS front door, and has been in use ever since. Adam performed occasional software updates to make the system more reliable and the web app easier to use, especially on a smartphone, but the core functionality remains unchanged since this first deployment. When TCMS moved to its present facilities at 326 State St in Binghamton in 2015, the ACS proved easy to transplant; the server was physically moved, and the wiring and door lock were installed in the new main entrance. Once installation was completed and the server was powered up, the ACS software booted and worked without any problems.

Phase 2: Tool Access

Once other building renovations on 362 State St. had been completed, the TCMS board – which now included Adam as secretary – started discussing implementation of the ACS’ tool access functionality for several of the larger, more complex, and/or potentially physically dangerous tools in the TCMS facilities. As there are some security and user interaction considerations for tools which are not applicable to the door, a series of discussions were held to determine requirements for this system. The final requirements are as follows:

  1. As the tool’s user has already entered their PIN on the main entrance keypad, there shall be no need to enter it again; the tool’s local access hardware is activated by scanning the user’s RFID tag
  2. The system must check that the user is authorized to make use of the tool by accessing the user’s training information in the ACS via the scanned RFID tag; if the user is authorized, the tool may be turned on
  3. When the user has finished making use of the tool, they must either press a “reset” button to lock the tool again or it must automatically reset and lock itself again after a period of inactivity; reducing the amount of effort needed to make use of the tool and the tool access hardware is crucial to having both items work well
ACS Implementation, Phase 2, with tool access

These requirements, in turn, raised additional questions:

  1. How can these rules be enforced by the hardware as well as the software?
  2. How is “inactivity” determined for a given tool?
  3. How many tools should be secured this way?
  4. Is there an off-the-shelf set of hardware that could be used? If so, would it work with the current door access control system?

Informal discussions with other Makerspaces were held by Adam to get outside perspective on design principles and implementations as part of this process. As with the original ACS, it was decided in the end to make use of off-the-shelf hardware for the physical component of the tool access functionality for reasons of budget, easy maintenance, and the ability to specifically design a system to fit the somewhat unique needs of a Makerspace. A short list of tools to be controlled with the tool access functionality was decided upon, and as all of these tools had been semi-permanently placed throughout the new TCMS facilities by this point, it was also decided to install the tool access hardware for each tool on the closest wall to the tool for the sake of maximizing space efficiency without resulting in potential usage hazards.

It was also decided during the design process for the tool access hardware to have screens on each hardware box, to display the status of the ACS with respect to the tool attached to that box. The amount of information displayed on the screen was deliberately kept minimal, for the sake of reducing user distraction while the tool is active. Built-in diagnostics for the tool access hardware is accessible only by specific users designated by the TCMS board, and includes general systems status and debugging info such as current draw (which is used to determine system inactivity).

The core of the tool access hardware is a Raspberry Pi Zero W, chosen because it offers the hardware resources necessary to implement the ACS functionality with respect to I/O ports and processing power at a price and power consumption level affordable by the Makerspace. The rest of the hardware was sourced as off-the-shelf components from suppliers such as AliExpress, Amazon, and DigiKey: LCD screens, RFID readers, Meanwell AC-to-DC power supplies to supply power to the tool access hardware, solid state relays and current clamps to control power to the associated tools, and some miscellaneous small electronics components.

Tool access electronics first working on protoboard

The tool access hardware was designed to remove power from the associated tool(s) altogether when the tool was inactive, to prevent any potential attempts at bypassing the ACS software to access the tool(s). Adam built a custom circuit to read the analog current value from the clamp and convert that current value to a voltage, before digitizing it to a value within a range of 210 and feeding that value to the Pi via an SPI connection. The software implemented on the Pi checks that digitized current draw value against a predefined, tool-specific threshold, and if that value drops below the given threshold, the software disables AC power to the associated tool after a timed delay to ensure that the tool has entered an appropriate state of inactivity. The solid state relays are used to enable AC power to the associated tool once the ACS has verified that the user has had training with that particular tool.

Adam enlisted the help of two other TCMS members in the tool access system’s design process: San Nguyen to design and oversee the manufacturing of the PCBs for the tool access hardware’s custom circuitry, and Cliff Burger to design and fabricate the physical enclosures for the tool access hardware. San has worked in different capacities as a software and electrical engineer, but his background is in PCB design and fabrication, so designing and instigating the manufacturing of a relatively simple PCB layout based on Adam’s circuits and incorporating the Pi and other hardware listed above was easy for him. As is usual for such projects, it took a couple of design revisions following initial debugging to settle on a layout that worked well for the project, but the end product works well! The final PCB has the LCD screen in its center, with other components (the Pi, two LEDs, a reset button, the current-clamp circuitry, etc.) mounted on the PCB with a combination of through-hole and surface-mount techniques.

San used the PCB layout software PADS to create the PCB design on a 2-layer board, as he had experience with that software and could create the design quickly and easily with it. He chose PCBgogo.com to fabricate the boards, as they are able to produce PCBs of reasonable quality inexpensively and with a relatively quick shipping time of ~1 week. A couple of “build parties” were held at the Makerspace to assemble all of the PCBs with their components once the final revisions of the PCBs had arrived; Adam, San, Cliff, and several other board members (Erik Leonard, Samantha Cameron, and John Flinn) all participated in the assembly of these boards.

Front and back of the custom tool access circuit board
A fully populated board mounted in the first prototype. Still a few more connections to make…

Cliff’s contribution to this project as an experienced machinist and mechanical modeler was to create physical enclosures for the tool access hardware, which he did using a 3D CAD model he’d created in SolidWorks. Like the PCBs, the initial enclosure design required a couple of revisions to finalize following initial testing with the system’s electrical components, but these revisions were minor in nature and followed changes made to the PCB. Cliff chose ABS as the material for the enclosures for reasons of cost, electrical isolation, ease of machining, and ready availability. All of the hardware for the enclosures were chosen from off-the-shelf components readily available from suppliers like McMasterCarr or Fastenal.

SolidWorks model of tool access enclosure interior (sans wiring)
SolidWorks model of tool access enclosure exterior

Once all of the tool access hardware systems had been fully assembled and had Adam’s software downloaded to the Pis, the systems were wired in with their associated tools, mounted to the walls, and integrated via the Makerspace WiFi network with the ACS. Final testing of the installed systems has proven that they work reliably as intended with minimal intrusion to usage of their associated tools. The total cost per unit of the tool access hardware is estimated to be under $150.

Completed tool access hardware unit

Phases 3 & 4: Dust Collector Integration and Future System Upgrades

Following the installation of a dust collection system in the TCMS wood shop, Adam decided to integrate it into the ACS / tool access system. He designed and assembled a custom, one-off circuit which is attached to the relay outputs of all ACS boxes associated with specific wood shop tools. When the relay on one of these tools is activated by a user with the appropriate training logged in the ACS, this new circuit sends a signal to a second relay box connected to the dust collector’s power circuitry; the relay box then powers up the dust collector to remove the wood dust from the tool being used. This second relay box powers down the dust collector when the tool being used is deactivated through use of the reset button or when the tool access hardware’s inactivity timer times out.

Dust collection relay box, with inputs from the tool access units attached to various wood shop tools
Dust collector power circuitry unit

Phase 4 of this project is intended to facilitate fine-tuning of the ACS and tool access system. One goal is to collect and analyze energy usage reports from each of the tools, via logs of which tools are used and for how long. The end goal here is to create a predictive failure analysis report via pattern analysis of the logged data for each tool, so that the TCMS board can plan for maintenance or replacement of tools or components therein. Cliff is also in the process of designing and fabricating custom silicone buttons be installed over the existing reset buttons in the tool access hardware units, to make the buttons easier to use and look more aesthetically pleasing. The PCB may be revised at some point to add a fuse between the power circuitry and the rest of the electrical components, to prevent power surges from burning out the test access hardware.

Overall this project has been an enormous success in terms of accomplishing the goals laid out by the TCMS board throughout its various stages of implementation and expansion! It is also a highlight in terms of collaboration by multiple TCMS members with various areas of expertise, and should serve the needs of the Makerspace for many years to come.

All photos, models, and diagrams courtesy of and property of Adam Biener, Cliff Burger, and Stephen P. Welte, and are used here with their permission.

Project Profile: Plasma-Cut Copper Sign by Yevgeniy Parfilko

Rasa Spa in Ithaca recently opened a new location in Watkins Glen, and they asked Makers in the general area for help in making a custom sign, which would have their name and logo made out of sheet metal with a warm copper finish. I reached out to them, and they were happy to work with me.

My original approach was to cut out the logo and letters out of 24 gauge aluminum with a nibbler, but the marketing director at Rasa wanted to have a sturdy, long lasting sign. So I asked Cliff Burger, the current TCMS Vice President, if it would be possible to use the plasma cutter at TCMS for this purpose, and he helped me get my letters cut from 2 sheets of 16 gauge steel.

Next, I had to create a textured copper finish that would also look both worn and warm. So I went hardware store hunting, and luckily found copper sheet flashing, which was significantly cheaper than copper plating or solid copper. I glued the copper to the metal letters and applied epoxy to the edges to prevent fraying of the combined materials.

Finally, I rubbed the copper down to create an imprinted texture, and applied a patina using a sulfur-based aging solution from a hobby store. Now it was time to mount the sign! I did not want to spend a lot of time out in the cold, so mounted modified wire crimps on standoffs to the back of the letters. That way, all I had to do was put three screws into the signboard, and my letter would snap right on. All in all, I spent two hours outdoors, most of which was spent climbing up and down a freezing ladder.

All in all, the project came out to about $150 worth of materials, which is pretty good for a custom sign made out of textured copper! You can easily spot Rasa Spa’s new location on N Franklin St in Watkins Glen.

Photo Credits:
All photos courtesy and property of Yevgeniy Parfilko.

Project Profile: Binghamton Philharmonic Brochures Stand

Triple Cities Makerspace is one of many organizations in the Binghamton area which – among other things – aims to provide one or more kinds of public service; in the case of the Makerspace, its public service is typically educational, but we also have taken on the creation of a variety of specific projects for other such organizations. One of these organizations is The Binghamton Philharmonic, a local professional symphony orchestra which puts on performances of a variety of classical and popular musical pieces in different area venues, but whose home is the Broome County Forum Theatre in downtown Binghamton. They reached out to the Makerspace via email in mid-2018 to see if one or more members of the Space would be willing to create a brochure stand for the Philharmonic from the dilapidated remnants of a chimes stand. This brochure stand, once created, was to be placed inside the Forum whenever the orchestra would be playing, to hold pamphlets advertising the Philharmonic and its activities in an upright, visible position. Erik Leonard and Cliff Burger, the current president and vice president of the Makerspace, volunteered to undertake the task of creating this brochures stand, and once the chimes stand was delivered set about remaking it into something awesome!

The chimes stand being upcycled had a steel frame with wooden and metal components used to hold the chimes, as shown in the picture below. The wooden piece had significantly deteriorated and was unusable, and the stand itself was coming to pieces and structurally unsound, but the rest of the components were determined usable. Erik and Cliff discussed what could be done with these pieces in terms of constructing a new frame and appropriate shelving to hold the Philharmonic’s pamphlets, then commenced to disassembling the stand so that the frame and chime-holding components could be refinished – as shown in the next series of pictures, below.

The chimes stand, in the condition it was as delivered to the Makerspace.
Disassembling the chimes stand.

The steel stand frame was cut down to a shorter size in order to better fulfill its new purpose, and all its components were sandblasted clean of their old finish before being welded into its new configuration using the metal shop’s Miller welder; the reformed stand was then spray-painted glossy black. The wheels from the original stand were cleaned and refitted into the stand’s base, and all of the chime set-screw holders were also cleaned and spray-painted black so that they could be repurposed to hold the new shelf dividers.

Removing the chime holders from the stand.
The refinished chime (now shelf!) holders, fresh from being sandblasted and repainted.

It was determined that a small amount of new material was needed to create the shelf and dividers which the brochures were to be placed upon, effectively replacing the wooden chimes holder which had been in a similar position in the original stand. This new shelf is comprised of several components: rectangular steel tubing for a frame to support the shelf, a small piece of plywood painted silver for the shelf itself, and steel leaves for the brochure dividers. Once the tubing had been welded into the reformed stand frame, the shelf was attached to it and the divider holders screwed into the frame behind the shelf, as shown in the pictures below. The dividers themselves were CNC’d from scrap steel at the space, and finished in a similar way as the frame itself.

Freshly welded steel frame for shelf!
The shelf being assembled with brochure dividers.

Cliff installed a finishing touch on the shelf: a metal plate created on the CNC machine, stating that the stand had been “refurbished by Triple Cities Makerspace”, and painted in black and silver. Once given a final cleaning, the stand was presented to the Binghamton Philharmonic staff, who were thrilled with the final product! Erik and Cliff were happy to do this work for the sake of building ties with another community organization and providing a substantial and needed piece of furniture to them, with the bonus of being able to reuse and upcycle an existing piece of furniture in the process!

Freshly CNC’d plaque!

Project Profile: Summer Savoyards Set-Building for “Arsenic and Old Lace”

James “Evil Jim” Ulrich and Mary Donnelly are two long-standing members of the Binghamton musical drama troupe Summer Savoyards, which has been putting on plays in various local venues since 1961. The Savoyards’ latest production of the beloved dark comedy “Arsenic and Old Lace” will be hosted in the Bundy mansion in downtown Binghamton on the first two weekends of April, and Jim and Mary have been building set pieces for it in the wood shop at the Makerspace!

Summer Savoyards chose to put on “Arsenic” because its darkly hilarious story appealed to the Savoyards’ executive board as well as several regular participants in the Savoyards’ productions. Savoyards’ main focus has traditionally been recurring adaptations of various Gilbert and Sullivan plays, but everyone involved felt like trying to adapt something different,  and to make use of a new venue in the Bundy mansion annex (in cooperation with some acquaintances there who wanted to promote Bundy as an events venue). Mary volunteered to be the play director, Jim volunteered to take charge of set design and construction, and everyone set about preparing for the show.

Mary wanted to have the show provide a more immersive than usual experience with respect to the audience, both for the sake of providing a fresh take on the play and because of the spacial limitations of the venue at Bundy. As such, Jim set about creating a seating layout for the venue which allowed for a reasonably sized audience to sit within a space arranged with some minimalistic set pieces designed to invoke the feel of a late Victorian living room (i.e., the set of the play), along with several pieces of Victorian furniture (a love seat, a china cabinet, etc.) sourced from Savoyards participants. Jim created or modified designs for several mock door and window frames in the modelling program SketchUp with elaborate detailing reminiscent of the Victorian era, as shown in the screenshots below, based on various Victorianesque design ideas he found through online research. Once he’d created and refined these designs, based on feedback from the other members of Savoyards with respect to physical size and layout, he printed them out with their corresponding bills of materials and cut lists, and took them to the TCMS wood shop to build them.

The Makerspace has been used by Jim for building set pieces for past Savoyards productions, but this production involved the largest utilisation of the wood shop for building set pieces yet. Jim, with the help of Mary, Amanda Truin, Eric Adler, and a few odd volunteers, had to build a full padded window seat with a window frame, five additional window frames to be suspended from the ceiling (including one created specifically cover a whiteboard in the annex), and several mock doorway frames. They had $500 to purchase materials to build these set pieces (plus a few additional material donations from Jim), and five weeks to build everything using the tools at TCMS plus a few additional ones provided by Jim. These tools included a table saw and sawhorses, a router, a screw gun, a pneumatic stapler, a multitool, a body grinder, a jigsaw, a chop saw, and various paintbrushes.

Most of the set pieces were built according to the original SketchUp designs, but there were a few modifications made along the way for various reasons. For example, the window seat’s lid was given an additional layer of  1/2” plywood to strengthen it, as various people would be sitting on it throughout the play and the original lid was deemed insufficiently rigid. This lid’s hinges were also extensively modified in several ways to make them squeaky for effect, including treating them with acid and a degreaser, having their pins hammered further into the hinges than typical, and leaving one end of the hinge looser than the other so that excessive flexing would occur. Jim further decided to modify the lintels on the door frames by adding 3/4” pine routed into strips for edge moldings, in addition to the existing frame moldings, to make them even more fancier. Final adjustments were made to the constructed set pieces to accommodate their mounting places in the venue (e.g., providing surfaces for clamps to be fitted to hold the set pieces in place). Finally, long-time Savoyards seamstress Julia Adams volunteered to build a cushion for the window seat and curtains for the window frames.

These set pieces are currently installed in the Bundy museum annex, and you can see them in person on the first two weekends in April  when the Savoyards company puts on “Arsenic and Old Lace”! As well as the TCMS members and friends already named, long-term Makerspace members Gary Alan Dewey and Leslie-Morgan Frederick are playing two different roles in the play itself. Come and check it out!


https://www.summersavoyards.org/events

Picture credits:
All photos and drawings are provided and owned by “Evil Jim” and Mary Donnelly.

SaveSaveSaveSaveSaveSave

Project Profile: Cliff Burger’s Knives

One of the most heavily-used parts of Triple Cities Makerspace is the Metal Shop, where members can frequently be found using its equipment to cut, mill, and weld to their hearts’ content. The person in charge of this area of the Makerspace is Cliff Burger, a mechanical engineer by trade and an enthusiastic machinist and metal-worker in his spare time! Cliff has worked on many group and personal projects in the Metal Shop for practical purposes, but recently he’s also finished a personal project for fun there – knife-making! He was inspired to do this after seeing some knife-making projects discussed in various online machinist forums, and decided that he wanted to put his personal touch on the general idea.

Cliff has produced two different kinds of knives so far. The simplest kind is one he made from a repurposed coarse wood file, chosen for its appropriate size as a piece of raw material as well as the high quality of its steel. A good knife blade will have a high carbon content, which allows the blade to have a sharper and more durable edge; and good files like the one he used are usually made with a high carbon variety of steel. The second knife was made from a stock piece of steel with a mixture of high-carbon and nickel-based stainless steel components for aesthetic purposes.

The process of making the blades for both knives is largely the same. The first step in the process is called annealing, where the raw material for the blade is heated to 800-1000 ℉ in a miniature kiln or specialty oven. This softens the material enough so that it can be reshaped into the form of a blade. A mill is used to do the three-dimensional reshaping, by trimming away any excess metal from the raw material until what is left is the desired size and shape; Cliff used a special carbide bit in the mill which could easily cut through the still relatively tough steel. The new blade is then given a beveled edge on its appropriate side using a belt sander.

Once the blade has been created, it must be treated to regain its toughness, where toughness is defined as strength of material, vs. hardness as the ability to resist deformation – the former quality is desired for a knife blade, for the sake of having it not break if too much force is applied. Cliff reheated the blade to 1000-1200 ℉, then immediately quenched it in a bucket of salt water (brine). Finally, he placed the blade in a 400℉ oven for an hour, let it cool to room temperature, then ran it through the oven at 400℉ for another hour before letting it cool again. This process is called tempering, which leaves the carbon inside the blade at a high-energy (and very tough) state, even when the blade has cooled to room temperature.

The blade is given a final finish using sandpaper of various grits – starting at 300, and working up to 1000 or 2000 – and a thorough application of polishing compound, so that it looks as awesome as it is tough! The second knife Cliff created especially benefited from the finishing process, as the pattern exposed with the sanding and polishing is gorgeous. Cliff used diamond honing stones to put a fine edge on both knife blades, which should last for a long time even with regular use because of the high strength of the materials. The first knife is currently having a wooden handle created for it out of two separate pieces of wood, called scales, which will be screwed to the butt end of the blade. The second knife has a much finer set of scales made of grade 2 anodised titanium, which Cliff enhanced by milling an artistic pattern into both scales, and by adding a frame lock and hinge to keep the blade extended once opened.

The second knife has been used regularly for every day handyman purposes since Cliff finished making it, and the first will see regular use as a kitchen knife once its scales are finished and installed! Two other members of the Makerspace have shown interest in making their own knives after seeing the ones Cliff made, and he is currently walking them through the process of making kitchen knives from files as he did. Hopefully more people will be inspired by his example to make their own practical and useful tools!

Picture References:

All pictures provided and owned by Cliff Burger and Stephen Welte

Project Profile: Maker Robots Mural

Triple Cities Makerspace has been established on the premises at State Street in Binghamton for over a year now. A number of people have devoted an enormous amount of time, effort, materials, and money towards fixing up the building and grounds, and outfitting the facilities with everything it would need to allow people to work on lots of different kinds of projects, from woodworking and welding to electronics and sewing. One important part of this process which has sometimes been overlooked is the furnishing and decorating of the premises; as the success of the Makerspace depends on its forming a dedicated community of enthusiastic creative people, it is important to have the building feel like a safe, comfortable, and welcoming place to be. To that end, Makers have made a concerted effort to paint parts of the Makerspace in warm and vibrant colors, and to donate artistic works or decorations to its rooms.

One of the most prominent artistic projects at the Makerspace to date is the large mural in the main room featuring two robots on a background of several dozen floppy disks. This artistic piece was the brainchild of Leslie-Morgan Frederick, a long-time contributor to and past board member of Triple Cities Makerspace. She was originally asked to create the mural by Drew Lacock, one of the founding members of the Makerspace, as a showpiece highlighting the artistic talent and potential of the TCMS community; he suggested a fan art painting of “Rock’em Sock’em” robots, which Leslie-Morgan extended to the idea of “makerbots”. The intent of this project was to highlight the idea of having a diverse set of people from all walks of life and with different levels of creative experience meet at the Makerspace to work on various projects and to share ideas, knowledge, and creative techniques with one another. As such, Leslie-Morgan’s idea was to have the mural feature two robots reaching out towards one another, not with fists, but with tools to make things – together. The floppy disks were used as a base for the mural to add the idea of the use of technology in making, both old and new.

With the basic idea of the mural conceived, work on it had to wait until the main room’s walls were drywalled and painted, which was done in the final months of 2015 and beginning months of 2016. At that point, the floppy disks were selected by color from a large cache of disks that had been donated to the Makerspace, and were then installed using liquid cement on a wall in the main room chosen for its proximity to the Makerspace’s main entrance and visibility throughout the room. As the rectangular mural base comprised some ~200 disks, arranged from black into progressively lighter and brighter shades of primary colors, this work took a couple of evenings and a lot of work on the part of Leslie-Morgan and a dedicated group of Makers to complete.

She then enlisted the help of her friend and fellow artist Amanda Truin, whose work can be seen on the 2016 Makersgiving potluck dinner invitations. The two artists collected paintbrushes, paints, and a stepladder from the Makerspace’s existing supplies, and set aside a Saturday just after the New Year to create the mural. After a quick discussion with Amanda regarding the intended purpose of the work, Leslie-Morgan quickly sketched out a basic draft of the mural with a pen on a piece of scrap paper, and they set to work together.

The resulting mural took shape as a completely collaborative and organic effort of Leslie and Amanda, whose artistic training and close friendship made the process of working on the project together very easy and fun. They were able to freely communicate various ideas and inspirations for the piece as a whole or in part on the fly, and to criticize and praise each other’s contributions respectfully. They each painted one of the robots after Amanda drew an outline of the entire project, with Leslie-Morgan’s robot (on the left of the piece) having a more illustrative style while Amanda’s robot (on the right of the piece) took on more of a cartoonish, 3-D appearance. Their different artistic styles ended up merging very well throughout the daylong marathon of painting, which was broken up by munching on crepes prepared by fellow Maker Ethan Bexley and the occasional dancing to background music! Room was also made for instantaneous or future additions to the project, such as the golden cube between the robots which is suggestive of a “Mario box”.

The completed mural is a highlight of the Makerspace facilities which makes the building feel much more homelike and comfortable, and is frequently commented favorably on by visitors to the Space. Hopefully it will serve as inspiration for many future artistic creations and collaborations by the local Makerspace membership, and will long serve to commemorate the spirit of communal Making!

Project Profile: Erik Leonard’s Electric Motorcycle

Probably the largest and most significant project to have been developed at TCMS since its inception is founding member Erik Leonard’s electric motorcycle project. Erik has long been interested in alternative energy sources and projects, and after reading about various homegrown electric vehicle (EV) projects online, decided that he wanted to make his own. Due to cost, complexity, and physical size restraints, he decided to try building an electric motorcycle rather than a car. This was still a very challenging project for him in a number of ways, however, as he then had no motorcycle license or riding experience, and despite an extensive background in robotics had never attempted to build or significantly modify any kind of vehicle before.

Erik chose the fundamental components for the first iteration of his motorcycle based on a combination of practical, convenience, and aesthetic reasons. A close friend was willing to sell him a sport bike (Kawasaki Ninja) which he could use as a base platform for a reasonable price; this particular bike has a wide aftermarket for mechanical replacement and upgradeable components, and appealed to Erik’s aesthetic tastes. The Ninja also happened to have a spine or ‘backbone’ frame, which made swapping out the existing gasoline powertrain a relatively easy task and provided lots of flexibility for mounting EV components in different spatial configurations for optimal weight balance, ease of installation / maintenance, and overall design effectiveness. Erik’s online research into other EV projects provided him with a set of equations for calculating how powerful of a motor would be needed to drive the bike, based on the projected weight of the bike + rider, desired top speed, and overall performance characteristics, among other things; after running through the calculations and double-checking his work, he was able to easily obtain a suitable motor from an eBay vendor. His research also put him in direct contact with many other EV creators, one of whom sold him a motor controller sourced from another EV manufacturer (Zero Motorcycles). Finally, the first iteration of the motorcycle made use of secondhand lead-acid batteries purchased from Craigslist for the power source, for reasons of cost and easy maintenance (in terms of swapping individual cells out as needed).

After acquiring all of these major components and putting a lot of time and effort into creating electrical and mechanical designs / layouts for the motorcycle based on these components, Erik started assembling it at the Makerspace’s old facilities in Johnson City. He was able to assemble the motorcycle with relatively few problems due to the extensive design preparation performed ahead of time, although installation of the batteries proved problematic due to their weight and to tight spatial constraints within the square-stock metal frame he’d welded and installed within the Ninja’s existing frame to hold the new powertrain components. He also found that the motor’s wiring was reversed with respect to his expectations, causing the motorcycle to only work in reverse when first turned on. After correcting this and replacing a few defective battery cells, however, he had a working electric motorcycle which he could legally drive around town!

Following an initial shakedown period and a growing enthusiasm for the project, Erik elected to make several improvements to his motorcycle. First, the lead-acid batteries were replaced with lithium-iron-phosphate units, which provided a lot more energy storage and transmission capacity as well as a significant weight advantage, albeit with a considerably higher up-front cost than the lead-acid cells. He chose this battery technology over the more commonly known lithium-ion batteries for reasons of safety, as the phosphate units are less volatile in the event of a crash. These upgrades increased the effective top speed of the motorcycle from 45mph to 70mph, and provided a far greater operating range of 60 miles from the original’s range of 15 miles. Second, he replaced the relatively crude square-stock frame with one designed in CAD software and created with laser-cut panels, which gave more room for the powertrain components and was far better tailored to the Ninja’s existing frame, as well as providing significant weight savings over the old frame. These upgrades were performed at the Makerspace’s current facilities on State Street in downtown Binghamton.

Erik continues to ride this motorcycle whenever weather permits, and gets a great deal of satisfaction from the experience as well as from being able to apply the knowledge and skillset acquired from this project into many others! He is also turning this project into a business venture, working with a fellow TCMS member (Stephen Musok) to launch a “plug and play” EV powertrain module for use in other electric motorcycle retrofit projects. All of the digital design files associated with this project are open-source, so any Makers with the tools, skillset, and ambition can use them to make their own electric motorcycle if they want to; however, given the complexity and level of resources needed to build your own electric motorcycle from scratch, this may be very difficult for the average Maker. Erik wants to make the electric motorcycle retrofit process a relatively simple and more accessible one! He is currently exploring packaging options for the powertrain module to make it compatible with the frames of various other popular motorcycles, and (with Stephen) speaking with various local organizations regarding manufacturing and selling a few motorcycles based on his current designs. His project looks to have a bright future, and the Makerspace is proud to have provided it with a home during its genesis and subsequent modifications, and to have Erik as a member!

Based on an interview conducted with Erik Leonard on 3/10/2017. All photos in this blog post are the exclusive property of Erik Leonard, and are used here with his permission. For more information on the electric motorcycle powertrain retrofit kits, please visit http://www.nextwavemotors.com.

A History of Aircraft Simulators in the Triple Cities

Link’s “Blue Box” – the first aircraft training simulator

Many people who live in Binghamton are aware of the long history of technological research, development, and manufacturing work done locally by companies like IBM, General Electric, BAE, and Lockheed Martin, with many cool products in the computing and military realms being developed here. It is often forgotten, however, that some of the first aircraft simulators ever created were developed here by a local entrepreneur named Edwin Link!

The son of a pipe organ manufacturer, Link developed an interest in flying in the 1910’s, and began taking flying lessons around 1920 or so. Frustrated by the lack of any devices that could provide training for potential fliers before stepping into a cockpit, Link worked with engineers and mechanical assemblers from the Link organ factory in the late 1920’s to design and build a mockup of a then-contemporary airplane cockpit with controls operated by air pressure from a bellows adapted from those used in the Link pipe organs! This cockpit was mounted on a platform which could move in three dimensions – tilting forward or back with the pitch control, rolling left or right with the roll control, or yawing horizontally left or right with the pedals. This motion of the platform, tied with input from the pilot into the corresponding controls, provided a simulation of the motion of an aircraft in flight, in three dimensions; this concept is still key to realistic (FAA-certified) flight simulators in use today by commercial or military pilot training schools.

Link initially manufactured a few for use at amusement parks or for training at local airports (including Endicott and Cortland), but saw the potential for widespread commercial application as the market for airplanes outside of the military and stunt/barnstorming markets increased; and he began promoting his simulators around the country. His commercial breakthrough came when the U.S. Army Air Corps (which would become the Air Force after WWII) began transporting air mail for the U.S. Post Office in 1934, and experienced many fatal accidents when new pilots encountered inclement weather or other unfamiliar flying conditions. Link demonstrated his simulator to officials from the Air Corps, and they were sufficiently impressed by it – as well as by Link’s ability to fly in hazardous weather using instruments and training acquired through use of his simulator – to place an order for 6 trainers. When the pilots who trained using these simulators demonstrated remarkably improved abilities compared with their peers, the Air Corps ordered more, and Link’s fledgling Link Aviation Devices company began producing the little “Blue Box” simulators (as they were nicknamed) from their factory in Hillcrest, just north of the city of Binghamton. The onset of WWII and the success of the Air Corps’ training using these simulators convinced the U.S. and U.K. militaries to order thousands of them, and Link’s simulators were soon seen as essential for use in training military pilots. As the commercial aviation industry expanded after the second World War, initially using some of the same aircraft used by the Allied forces and flown by ex-military pilots, Link expanded into this field as well, and became the preeminent aircraft simulator manufacturer for the next three decades, providing training equipment for governments and corporations around the world and even supporting special projects like Lockheed’s SR-71 Blackbird and NASA’s Apollo program.

After corporate mismanagement, international competition, and a hostile takeover resulted in the dismantling of Singer-Link (the successor to Link Aviation Devices) in the late 1980’s and early 1990’s, several companies picked up the pieces and continued the legacy of aircraft simulator design and manufacturing, including L-3 Communications, which still has a presence in the Binghamton area today and is responsible for the creation and maintenance of aircraft simulators for programs like the United States Air Force’s C-17 cargo planes. Several other companies in Binghamton also thrive on the legacy of Link’s simulators, including KRATOS Technology and Training Solutions and Simulation and Control Technologies – both of whom design and manufacture aircraft simulators in the Binghamton area – and BAE and Lockheed Martin, who use aircraft simulators created by companies like these to develop avionics hardware and software for commercial and military applications in Endicott and Owego. Decades after Edwin Link was inspired to find a better way to teach himself how to fly, the technological field he pioneered is still a vital part of the training processes for thousands of pilots around the world, and is still a major component of the Triple Cities’ economy.

Sources:

“Link, Edwin Albert”. Nationalaviation.org. The National Aviation Hall of Fame, 31 Oct. 2016. Web. 3 Nov. 2016.

“L-3 Link Simulation & Training: History.” Link.com. L-3 Link Simulation & Training, 31 Dec. 2012. Web. 3 Nov. 2016.

Tomayko, James E. “Crew-training simulators.” NASA.gov NASA April 1987. Web. 3 Nov. 2016.